Dec 31, 2015

Altered Box

This time an altered box which originally housed Pretty Wooden hearts.

Its just a cute little 4" Square box with compartments. Was eyeing from the time i purchased those and had one such pretty moment to alter it....


Yeah...I made this for a blogger pal who is a wonderful soul, whose amazing talent is to turn any Trash (from micro to macro level) into Treasure. Her imagination is beyond human measure and am at awe at everytime of my visit to her blog.

She's none other than deary Rupa of Tofa. Its a must see.. must bookmark.. blog. Do visit and am sure you are gonna be mesmerised by the projects there :)

She has got my teeny tiny RAK and its time to post pics here...

Now left to her to say about it...As she is an expert in Altered Project...Its just my baby step in the altered art world :)


Process:

The back of the box is first coated with Prima chalk paint Sand and applied Prima White clear Crackle paste by hand in an uneven fashion. And after few minutes, started those moments of crackles...And was pretty enjoying those.


After is dried completely applied Rich cocoa momento ink and those crackled crevices took up those inks beautifully and the textures look were real yum...Sure am gonna try these lines of projects soon.

On the front, measured each compartment and it perfectly fitted for Cuttlebug square diecuts which are took from pp. The edges are sponged with toffee crunch momento ink, to give shabby effect and then modpodged it using Matt version.


Made floral sprays using Big blooms are brushed with wink of stella clear, few leaves, hip roses, mini roses. Prima resin frame (colored using prima chalkpaint - pink) housed a Love cabochon and few pearl strings added to it. Resin heart, prima resin swirls (colored with momento ink slightly, brushed with wink of stella clear), Kaisercraft Label banner - Friends , TH word band, 2 pink glitter alphas, few pearls.. all took its respective places to sync well :)


Now its your turn to say about this work :) Would love to hear it from you.

Dec 28, 2015

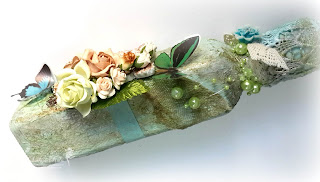
Altered Bottle with Mixed media touch :)

Exactly an year since prima workshop, first ever workshop of that kind in India by Prima educator and my dear friend Bipasha Kashyap. Lucky enough to attend that in chennai and had been so lucky to see her Mixed media Demo as a topping for our 2 day workshop, which has given me wings.. must say to explore myself in this art :)

Altered bottle...first every try!


Its a 9 inch tall Olive oil bottle which i had soaked in warm soapy water for a day to peel off the stickers from it.

Next i sanded with a sanding block to give tooth to the surface before i prime it.  Gessoed down completely with 2 coats and after drying it completely, took kitchen tissue crumbled pieces and start to adhere using Modpodge Matt. Adhered at an uneven fashion to get a textured base.


Then when all dried up, coated with Prima Chalkboard paint Egg blue of 2 coats drying up completely at every coat. Me seems no happy...you see...now am on an MM addiction :D

Close up shots of Textures :)


Took Prima clear crackle paste and started to apply on the  surface with hand and hit heat gun to bring out the textures. Little more for textures...misted cheesecloth modpodged on the bottle just for the focus.


From top of the bottle, i sprayed Lindy's stamp gang sprays  - Azure sea asters (for blue), Sea mint green and Opal sea oats (brown) in a one by one fashion and drying up at each spray to set the color.


Then started the embellishment. I just kept minimum to show off the textures as focal element here,

Prima resin frame, laces, local bought resin flowers,  butterfly stickers, crocheted laces, pearl strings, Dream cabochon, bottle cap, Mixed flowers floral spray for the embellishment part.

In the last pic, i have added a light blue washi tape like a belly band around the bottle centrally to add little interest to it.

Want to end 2015 with an Inspiration and so this 'DREAM' titled project :)

Dare to Dream....
Don't Say them...Show them!!

Wishing you loads and loads of success, joy, peace in the forthcoming years.
Very Happy New year 2016 to all my blogger pals, visitors :)

Playing along the following challenges:

Artful crafting - #9 Altering

Lulupu - Deckup your home (Altered bottle, light blue washitape, modpodge matt)

Sweetstamps - Dec Anything goes 

Dec 21, 2015

Sending Joy :)

After a long time, Shabby chic layered card from me...This time from Winter wonderland :)

Bought few So suzy stamps (SSS)..must say i love those for their cute font sentiments and the lovely image sentiments.


Now onto card :)

Took 15cm square top fold card. Matted with 2 layers.

To the first layer stamped Kaisercraft wood stamp using Toffee crunch momento ink and sponged their edges using Rich cocoa momento ink. Then using scissors, ran it around the edges of the card to give a distressed look.

The next layer is prepared using embossing paste on a stencil and heat embossed using wow nice blue glitter Ep . It wasnt that visible here as i topped up with a piece of biege lace at one end, Cheerylynn Florish diecut at another corner and lastly a cheese cloth for all that shabby look.

The image is stamped on a piece of watercolor paper and using Archival black stamped SSS winter girl and masked her and stamped the christmas trees (SSS) around her. And keeping the mask, smooshed versamark ink below her to create a snowbank sort of and heat embossed using Ranger's white opaque Ep.


I just water colored her using Tchibo aquarelle pencil and using stickles diamond traced the snowbank and sprinkled POP white microbeads . And using Colorbox white frost sponged lightly on and around trees and sprinkled with Ranger's white opaque Ep and heat embossed.

Brushed wink of stella clear on top and side of card, added wow nice blue Ep and heat embossed it for that little extra shine and glam.

Those icicles are made using Hot glue gun and to it added perfect pearls powder using water. Few vellum snowflakes diecuts added with pearls centre and those are highlighted using wink of stella clear glitter.


Added 2 corner diecuts in silver cs and a sentiment banner which are sponged lightly at corners using toffee crunch to finish off the card. Except the first layers, all layers are popped up using foam adhesives.

Playing along the challenges:

Mixed Media card challenges#18 - Celebration +vellum ( Christmas themed+vellum diecuts)


Stamplorations December challenge (followed theme)


Virginia View challenge - All that glitter (Perfect pearls, silver cs, wow nice blue glitter Ep, Diamond stickles, Wink of stella - clear)

Peek-a-boo designs - Holiday greetings (inspired by colors - blue, grey, snowflakes, snow,trees)


Dec 19, 2015

One layer cards :)

Love for distressing, sponging continues...

Super simple OLCs...


Took A2 sized prescored cs and masked a rectangular area for sponging.
Started with Mustard seed, Rusty hinge DIs at a corner, masking a circular area for sun.
Another corner is sponged with peeled paint and shabby shutters for the ground.
Stamped silhouette wild flower stamps at a end with few dragonflies using Black Archival ink.
Mounted a distressed banner with IBS sentiment using foam squares.


Took A2 sized prescored cs and masked vertical areas on both sides for sponging.
From down end, started with peeled paint and shabby shutters and slightly with Black soot DIs.
Then from top end, sponged with stormy sky.
Stamped silhouette wildflowers and butterflies stamps using archival black ink.
Wplus9 Sentiment added to card base to finish off the card.


Hope you like these super simple cards :)

Playing along the challenges:

Inspirational Challenges - Bah humbug

IBS- customer gallery (Thinking of You frm IBS stampset)

Dec 17, 2015

Let it Snow :)

Second post for today...This card has been sitting to be blogged for a while now and so thought to share.

Yeah...a simple CAS styled one with no fancy embellies or layers :)


5"x7" kraft cs is matted with a watercolor panel which is smooshed with versamark ink from top directly from inkpad and embossed with white opaque wow embossing powder, just to mimic the falling snow.


Below which, using LSG spray , loosely spread the mist with plenty of water and prepared the front panel. Small scrap piece of white cs taken which is smooshed with versamark and embossed with silver fine embossing powder and then its used to diecut Cheerlynn snowflake diecuts. Its one of those easy ways to emboss the teeny tiny diecuts.


Silver embossed IBS sentiment on vellum and a piece of silver grey glitter tape to finish off the card.
Hope you like it!

Playing along challenges:

IBS customer gallery (Winter wishes stamp set)

IBS#101 - colors (white, grey)


virginia view challenge#21 - All that glitter

Craftycardmakers #154 Snow

Stamplorations - December challenge - Based on theme

Vellum Poinsettia card

White and Silvery Poinsettia card today.


5.5" top fold square card in White taken. To it matted a silver adhesive sheet. And top of it, matted the square Cheerylynn Mexican tile diecut in white.

Poinsettia is stamped on vellum using versamark and Heat embossed using Silver Ranger's Super fine Embossing powder.


IBS sentiment is stamped on Vellum using Archival Ranger's ink.

Wink of stella clear shimmer added on the poinsettia petals and on the sentiment for the subtle shimmer.


Tried few angle shots to capture the shimmer and shine but ended in vain.
Few white pearls are added as accents to finish off the card.

Playing along:

IBS#101 - Colors (used grey, black and white)


IBS - Customer Gallery (used IBS christmas sentiment stamp set)

Virginia View Challenge #21 - All that glitter (used Silver embossing, Wink of stella clear, Silver adhesive sheet)

Cheerylynn Designs - Sparkle and shine (Used CLD mexican tile die)

Fantastic tuesday - Anything goes with sparkly

Creative inspirations - Merry Christmas

COlor throwdown - Christmas card

Stamplorations - Dec challenge - Stamp and Holidays

Dec 13, 2015

Deer Trio Shaker Card :)

It's my ever first try at Shaker cards, which is so popular now in Craftland :)
Xmas and New year is nearing and its time to gift a card to my son's class teacher as Winter holidays gonna begin soon :)


Took 5.5" topfold card and to it added a kraft cardstock.


Stamped snowbanks and trees using momento inks and to it added Diamond stickles. And sprinkled white opaque embossing powder and heat set it to mimic snow fall and on the banks, using versamark ink, randomly spread the ink and heat embossed using white opaque embossing powder

The memory box deer trio is cut on a kraft cs and its sponged on edges using Momento rich cocoa and using white frost pigment ink, its sponged randomly and added to the snow banks.

The edges of the kraft cs are distressed using scissors and are sponged with Momento rich cocoa. IBS Snowflakes are stamped using versamark and heatset using white opaque EP. And with white frost pigment ink, the edges are lightly sponged again to give a snowy atmosphere.

Twinklets Diamond dust is added as the shaker elements as its the only element i had in hand and hope it perfectly would suit the winter scene. Am not all that glitter lover, hope this diamond dust and stickles gives that subtle shimmer and glam. The round dome is carefully then placed.


A small floral spray using few leaves diecut and which are distressed using peeled paint, shabby shutters, berries which are colored red and heat embossed with clear EP, and stick pollens with a red knotted bow added with a white tulle piece.

A side notched vellum sentiment banner is added to finish off the card.

Hope you like this first ever try of my Shaker card :)

Playing along the challenges:

Virginia view #21 - All about glitter (Twinklets Diamond dust and Ranger's Diamond stickles used)


IBS - customer gallery (Winter wishes and christmas stampsets used)

Anything but cute - You've got Happy mail

Mod squad challenge - All that glitters

Dec 7, 2015

Mixed Media Reverse Canvas

Hello Craft peeps,

Today's project from my end is a long awaited attempt of Mixed media Reverse canvas.


The whole canvas - Gold, pink, fuschia, glitters, brush scrip letterings all inspired from Scrap Around The World 's gorgeous moodboard. Its their final challenge and we are gonna miss such a inspirational place. I learnt a lot from that blog and its my 4th time participating there.


Took 8"x10" canvas and trimmed the canvas ends a bit, added lace trims and gessoed down wholly. For its centre, wished to add a sturdy box lid which was originally a packaging box of perfumed spray.  Glued the wooden pieces of stretched bars, which acccompanies the stretched canvas on the box lid randomly and applied a generous coat of gesso and stenciled that with TCW tetraquadra foil stencil. Meanwhile, using modelling paste, stenciled the centre portion using MFT moraccan tile. Added box lid using glue gun on canvas centre.


On the sides of canvas, stenciled with TCW mini Art is and mini Damask stencil using Prima modelling paste. Once its dried, sprayed LSG Glory of seas Gold and cocklebells Coral drying at each interval using Ranger's Heat it tool.


Added floral spray, vines, Prima resin, metal embellishments on the centre box lid and slightly gessoed down. The edges of big blooms are gold embossed using Ranger's superfine gold Ep. Gold glitter balls, Lipgloss microbeads are added to resin. Prima junkyard treasure Inspire Zipper added to the metal butterfly. Timholtz wordtag band added with thin ribbon. A tiny vial of copper micro glitters are added and glued down near the word band.

Few portions of the box are highlighted with pink and gold gelatos.

Stamplorations stamps - Create and Discover are heat embossed on Vellum and added to the canvas. Prima Swirls are gessoed and sprayed with LSG Gold and coral sprays and after which gold heat embossed with Ranger's gold EP. Then its sanded a bit randomly to show through the layers and added on corners.

Prima copper micro glitters, gold pearls are randomly added as accents in the canvas.
Hope you like my first attempt at Reverse Canvas, with a twist of Upcycled bit :)

Playing along

Stamplorations - Anything goes (used Create , Discover stamp sets)


Stamplorations - Dec MM stencil challenge (used Stencils - MFT moraccan tile, TCW tetraqudrafoil, Art is and Damask)


IBS#100 - Used Vellum and Gold

We love to create - Anything MM

Stamplorations - Flash stencil Link party - (used Stencils - MFT moraccan tile, TCW tetraqudrafoil, Art is and Damask)

Mixed media monthly challenge #19 - (used Gold)


Nov 30, 2015

Vellum Floral card

Back to cardmaking and today its a simple embossed card.

Took a dark brown cs and heat embossed Stampendous Zinnia bold flower in Ranger's White Ep. Yup similar card did in past week but this with a subtle difference though both carries same softness and suppleness :)

Must say, fallen in love with this flower stamp and i cant get enough of it :)


Matted on top with a vellum to soften the overall bold look. Stamped Zinnia using Archival Sepia ink on vellum and colored using Tchibo pencils. It not wet brushed as vellum is non porous.  Used 2 shades of brown to color and fussy cut it.

Stamped Inkadinado music bg stamp on vellum focal piece using Momento tuxedo black and popped Vellum zinnia on it using foam adhesive.


Sentiment from Stamplorations is added on a piece of vellum which is notched at an end for added interest. Few prima sugar dots are used finally as accents.

This again matted on white cs as base using double sided tape :)

Linking this to

Stamplorations - Anything goes (used sentiment stamp of ur store)

IBS #100 used vellum

Nov 29, 2015

Winter Wonderland MM canvas

Hiya Crafters,

Its been a long time, since i posted in my blog. Bit busy with Little one's exams and it just got over today and very soon his winter holidays gonna start.

Made this Winter Mixed media canvas taking inspirations from the gorgeous moodboard below, which screams snowy wintery weather :)


Am linking this to Scrap around the world - November challenge

Its a 8"x10" stretched canvas which i primed with gesso and started to work on. The snow drippings were made using the hot glue gun and its gessoed again to take up inks.


Central focal image is made using the cinnamon sticks from my potpourri collection. The idea is got from the pic inspiration, with varying lengths of sticks and glued down using hot glue gun on a vellum and added a paper pieced star to it. It was further matted with pps from Papermania Christmas collections.

The textures are made using TCW tile stencil using Finnabair Modelling paste and drywall tape and surrounded it added texture paste clear crackle and used back of spatula to create textures to it,

Used heat gun to dry the paste and sprayed LSG - Azure Sea Asters for those gorgeous shine of blue starting from the glue gun drips.

Added the focal element with Cheerylynn Designs Italin florish diecut, few resin pieces, cabocons, Gold heat embossed IBS sentiment on vellum, and few Cheerylynn designs snowflake diecuts on silver cs around it.

At the bottom of the canvas, added glue generously and added White shiny finish popbeads and to which sprinkled perfect pearls for the shiny snowy bank effect and the same applied on the glue gun drips too for the shine with little water.

Hope you like it!

Linking this to

IBS customer gallery - IBS winter wishes stamp set used for sentiment

IBS#100 - used vellum and Gold

Stamplorations - Nov MM challenge (used TCW tile stencil)


Mixed media world challenge - Anything goes

Mixed media monthly challenge - Textures

Nov 19, 2015

Trio Deer Wishes :)

Inky card series again  but this time, its a Tag :)

Am a shabby chic lover whose heart just goes behind mostly for pastel and soothing tones. Love making my own handmade flowers and heavily embellished layered card is my style.

Truly wanna deviate and explore this one layer super quick inky background cards. So the learning continues :) 


Took Sizzix largest tag die (oh yeah new addition to my stash) and diecut Ranger's watercolor cs and used the textured side for my project today. Masked a border around the tag and started working.

Masked an area for moon and started building layers using blue inks and it goes like this - tumbled glass, broken china and Salty ocean DIs. 


Smooshed versamark on a white cs and heat embossed with white opaque  Rangers Ep. The grainy texture was so apt and i have cut snow banks from it and popped it at lower end of card.

Colorbox cream white pigment was smooshed on acrylic sheet and that was smooshed again carefully on the inked edges of the tag, so as to mimic the falling snow. Now you have got it, why i took textured side of the watercolor cs :)

Then to it, added diecut snowflakes from Cheerylynn snowflakes dies and added on the top of the inked bg. Now took off the mask of moon and it was just shining brightly on a snowy wintery night. 


Cut Deer trio diecuts from memory box dies on a white cs and popped on the snow bank at varying levels of depths to show the distance and those deer family are lightly sponged on edges using rich cocoa momento ink to get defined look.

IBS sentiment is stamped on vellum and popped up on top of snow banks.

Hope you like my inky creations' series :) 

Challenges:

Cheerylynn designs - Tag you are it! (used CLD snowflakes dies)

IBS- used ribbon and vellum


IBS customer gallery - used IBS Christmas sentiment

Deep ocean challenge #117 (white and blue)

Simon says stamp wednesday challenge - Christmas

Alphabet challenge blog - T is for T'is the season